Reference
- For more information about integration and dissection, refer to "Setting up Micronet Integration".
- For more information about T accounts, refer to "T Accounts".
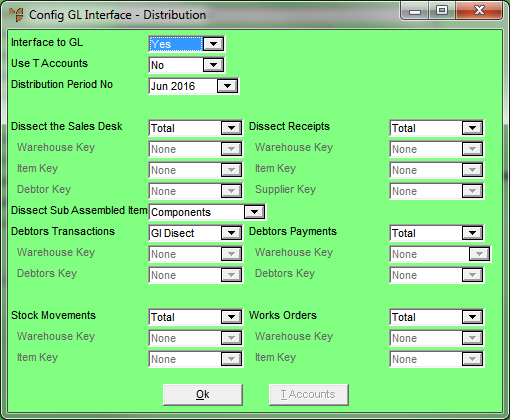
Use this option to setup the interface between the Distribution system (MDS) and the General Ledger (MGL), including how transactions are dissected and posted to the General Ledger. You can also use it to setup T accounts to further flag the dissected transactions for reporting.
|
|
|
Reference
|
To setup the interface between MDS and MGL:
Refer to "Selecting a Company to Edit"
Micronet displays the Config GL Interface (Distribution) screen.

|
|
Field |
Value |
|
|
Interface to GL |
Select Yes if you want Micronet to automatically transfer sales, stock and debtors’ information from MDS to the Micronet General Ledger system. This initiates integration between MDS and MGL. If you select Yes in this field, you need to setup the GL Interface master file containing a GL interface record for each supplier in the Supplier master file (refer to "File - GL Interface"). |
|
|
Use T Accounts |
Select Yes if you want to use T accounts in integration between MDS and MGL. This activates T accounts in both systems, enabling the T1 to T5 Account fields on screens for each type of transaction. Using T accounts requires customised GL interface records that complement the coding system you have setup in the T Account master file in MGL (refer to "File - T Accounts"). You setup these customised GL interface records using the Config T Accounts screen (refer to the next section "Configuring T Accounts"). |
|
|
Distribution Period No |
Select the GL period that transactions will update to in the General Ledger, i.e. the current period in Distribution. Every transaction processed in MDS will be tagged with the period number set at this option. When performing an End of Month in MDS, Micronet automatically rolls over to the next period. |
|
|
Dissect the Sales Desk |
Use these fields to customise the integration of sales and Cost of Sales to the General Ledger. They also allow for multiple Trade Debtor Control Accounts in the Balance Sheet of the General Ledger. For more information about these fields, refer to "Dissect the Sales Desk". |
|
|
Dissect Sub Assembled Items |
Select how you want sub-assembled items dissected to the General Ledger. For more information about this field, refer to "Dissect Sub Assembled Items". |
|
|
Dissect Receipts |
Use these fields to customise the integration of goods received and stock to the General Ledger. They also allow for multiple Stock on Hand control accounts in the Balance Sheet of the General Ledger. For information about these fields, refer to "Dissect Receipts". |
|
|
Debtors Transactions |
Use these fields to customise the integration of debtor transactions for hand written invoices and journals to the General Ledger. They also allow for multiple Trade Debtor control accounts in the Balance Sheet of the General Ledger. For information about these fields, refer to "Debtors Transactions". |
|
|
Debtors Payments |
Use these fields to customise the integration of debtor payments to the General Ledger. They allow for multiple Bank accounts or Trade Debtor control accounts within the Balance Sheet of the General Ledger. For information about these fields, refer to "Debtors Payments". |
|
|
Stock Movements |
Use these fields to customise the integration of stock movements and adjustments to the General Ledger. For information about these fields, refer to "Stock Movements". |
|
|
Works Orders |
Use these fields to customise the integration of stock movements on works orders produced within the Micronet Kitting System. For information about these fields, refer to "Works Orders". |
Micronet redisplays the Change Existing Company screen.
Refer to "Logging in With Updated Configuration (Method 1)" or "Logging In With Updated Configuration (Method 2)".